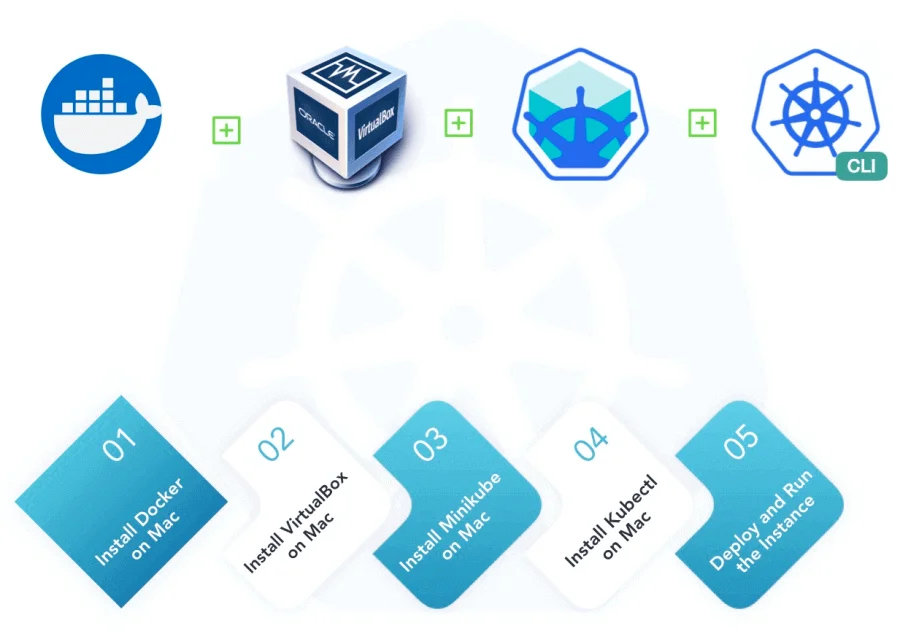
Installing a cluster in the cloud is very easy, because almost every cloud provider has its own solutions (Google GKE , Amazon EKS , Microsoft AKS). But installing a cluster in the cloud for academics, development and testing purposes can be always expensive. So the solution is to be able to run Kubernetes locally. In this article, i have listed all the steps on how to install a local kubernetes cluster in Mac with minikube for development and testing purposes.
Prerequisites to Install Minikube
The below tools are required to run a kubernetes cluster on your local machine.
- Install Homebrew
- Install Docker for Mac
- Minikube
- Virtualbox
- VirtualBox extension pack should be installed
- Kubectl
Why we need all these tools to run a local Kubernetes cluster
Before installing all these tools you have to mandatorily know how these tools are related to each other.
Homebrew
Homebrew is a package management tool under the Mac OS platform. It helps you to install the stuff you need. It has many useful functions such as installation, uninstallation, etc. You can implement package management without you having to care about various dependencies and file paths, which is very convenient and fast. So before installing minikube and its dependencies, we need to install Homebrew package manager.
Docker
Tool that focuses on developer experience to build and share containerized applications. Docker Desktop comes with many well-known tools, such as Docker Compose and Docker Machine.
VirtualBox
Virtualbox is a general tool for running virtual machines. It is currently available for all major platforms like Mac OS X, Windows, Linux.
Minikube
Minikube is a tool that makes it easy for new aspirants to run kubernetes locally. It runs a single node kubernetes cluster in the local virtual machine (Virtualbox), meaning on our laptop. It is extended for developers looking to test kubernetes or develop applications for kubernetes. So before installing minikube, we need to install the VM on this machine. Here I choose VirtualBox to ignore the installation process.
Kubectl
kubectl is a command line tool for Kubernetes. This tool used to interact with the Minikube kubernetes cluster and view cluster resources, create, update, delete various components, etc., and it is very easy to install it on the local Mac.
Installation Guide
▌Install brew package manager if not installed before.
$ /bin/bash -c "$(curl -fsSL https://raw.githubusercontent.com/Homebrew/install/HEAD/install.sh)"▌Install Docker
Download the Docker desktop dmg file and double click to install it. Follow these steps to get docker on your mac.
▌Install VirtualBox
From the official website directly download and install the package and after that install VirtualBox Extension Pack as well.
▌Install Kubectl
Install via Homebrew
$ brew install kubectlInstall via curl
$ curl -LO "https://dl.k8s.io/release/$(curl -L -s https://dl.k8s.io/release/stable.txt)/bin/darwin/amd64/kubectl"Give execution permission
$ chmod +x ./kubectlMove kubectl to PATH
$ sudo mv ./kubectl /usr/local/bin/kubectlAfter installation, type in the terminal kubectl and all available commands of kubectl will be listed.
$ kubectlNote: For other platforms, please refer to kubectl installation introduction
▌Install Minikube
Install via Curl
$ curl -Lo minikube https://storage.googleapis.com/minikube/releases/latest/minikube-darwin-amd64 && \
chmod +x minikube && \
mv minikube /usr/local/bin/
Install via Homebrew
$ brew cask install minikubeAfter installation is complete, type in the terminal minikube and all available commands of minikube will be listed.
$ minikube
minikube provisions and manages local Kubernetes clusters optimized for development workflows.

Basic Commands:
  start          Starts a local Kubernetes cluster
  status         Gets the status of a local Kubernetes cluster
  stop           Stops a running local Kubernetes cluster
  delete         Deletes a local Kubernetes cluster
  dashboard      Access the Kubernetes dashboard running within the minikube cluster
  pause          pause Kubernetes
  unpause        unpause Kubernetes

Images Commands:
  docker-env     Configure environment to use minikube's Docker daemon
  podman-env     Configure environment to use minikube's Podman service
  cache          Add, delete, or push a local image into minikube
  image          Manage images

Configuration and Management Commands:
  addons         Enable or disable a minikube addon
  config         Modify persistent configuration values
  profile        Get or list the current profiles (clusters)
  update-context Update kubeconfig in case of an IP or port change
  ...
After installation, view the installed path in the machine.
$ where minikube
/usr/local/bin/minikube
You can also check the current version of minikube
$ minikube version
minikube version: v1.20.0
commit: c61663e942ec43b20e8e70839dcca52e44cd85ae
Then start minikube. If it is the first time to start the reader, it will take a decent amount of time to download the image file and create the VM first
$ minikube start
😄  minikube v1.20.0 on Darwin 11.3.1
✨  Automatically selected the docker driver. Other choices: hyperkit, virtualbox, ssh
👍  Starting control plane node minikube in cluster minikube
🚜  Pulling base image ...
💾  Downloading Kubernetes v1.20.2 preload ...
    > preloaded-images-k8s-v10-v1...: 491.71 MiB / 491.71 MiB  100.00% 2.13 MiB
    > gcr.io/k8s-minikube/kicbase...: 358.10 MiB / 358.10 MiB  100.00% 1.39 MiB
    > gcr.io/k8s-minikube/kicbase...: 358.10 MiB / 358.10 MiB  100.00% 2.73 MiB
🔥  Creating docker container (CPUs=4, Memory=2048MB) ...
❗  This container is having trouble accessing https://k8s.gcr.io
💡  To pull new external images, you may need to configure a proxy: https://minikube.sigs.k8s.io/docs/reference/networking/proxy/
🐳  Preparing Kubernetes v1.20.2 on Docker 20.10.6 ...
    ▪ Generating certificates and keys ...
    ▪ Booting up control plane ...
    ▪ Configuring RBAC rules ...
🔎  Verifying Kubernetes components...
❗  Executing "docker container inspect minikube --format={{.State.Status}}" took an unusually long time: 3.319857291s
💡  Restarting the docker service may improve performance.
    ▪ Using image gcr.io/k8s-minikube/storage-provisioner:v5
🌟  Enabled addons: storage-provisioner, default-storageclass
🏄  Done! kubectl is now configured to use "minikube" cluster and "default" namespace by default
Finally, you can view the current status of minikube
$ minikube status
minikube
type: Control Plane
host: Running
kubelet: Running
apiserver: Running
kubeconfig: Configured
Verify installation
Sanity check: check if kubectl tool can connect to the minikube cluster.
$ kubectl get pods
No resources found in default namespace.

$ kubectl get service
NAME         TYPE        CLUSTER-IP   EXTERNAL-IP   PORT(S)   AGE
kubernetes   ClusterIP   10.96.0.1    <none>        443/TCP   2m56s
Execute the simple application deployment Hello on minikube
After starting minikube, we can create a simple deployment with 1 container using nginx without any external dependencies. Create application configuration named nginx_deployment.yaml file
$ vi nginx_deployment.yaml ---
apiVersion: apps/v1
kind: Deployment
metadata:
name: nginx-deployment
labels:
app: nginx-deployment
spec:
replicas: 2
selector:
matchLabels:
app: nginx
template:
metadata:
labels:
app: nginx
version: "1.18"
spec:
containers:
- name: nginx
image: nginx:1.18
ports:
- containerPort: 80
env:
- name: env
value: "test_development"
---
apiVersion: v1
kind: Service
metadata:
name: nginx-service
labels:
app: nginx-service
spec:
type: NodePort
ports:
- port: 80
targetPort: 80
protocol: TCP
name: http
selector:
app: nginx
version: "1.18"
Run application
$ kubectl create -f nginx_deployment.yaml
deployment.apps/nginx-deployment created
service/nginx-service created
Verify application deployment
$ kubectl get deployments
NAME               READY   UP-TO-DATE   AVAILABLE   AGE
nginx-deployment   2/2     2            2           59s
$ kubectl get pods
NAME READY STATUS RESTARTS AGE
nginx-deployment-5dfc7b56d8-k4gk4 1/1 Running 0 2m2s
nginx-deployment-5dfc7b56d8-nqw74 1/1 Running 0 2m2s$ kubectl get services
NAME TYPE CLUSTER-IP EXTERNAL-IP PORT(S) AGE
kubernetes ClusterIP 10.96.0.1 <none> 443/TCP 9m5s
nginx-service NodePort 10.101.233.134 <none> 80:30836/TCP 2m20sSo for, simple application is deployed.
Cleanup
We will cleanup the sample nginx application before continuing with more complex application.
$ kubectl delete deployments nginx-deployment
deployment.apps "nginx-deployment" deleted
$ kubectl get deployments
No resources found in default namespace.$ kubectl delete service nginx-service
service "nginx-service" deleted$ kubectl get services
NAME TYPE CLUSTER-IP EXTERNAL-IP PORT(S) AGE
kubernetes ClusterIP 10.96.0.1 <none> 443/TCP 39hConclusion
In this article, I have detailed the required tools that can be used to set up a local Kubernetes cluster in mac. I suggest you to follow Kubernetes learning path, and practice all the concepts in the local cluster.