Open policy agent (OPA, pronounced “oh-pa”) is a tool that provides a unified framework and language for declaring, implementing, and controlling the policies of each component in the cloud-native solution. It also supports policy as code of various platforms including Kubernetes. OPA provides declarative Rego language to describe policies, and offloads policy decisions to OPA, thereby reducing the decision-making process, which is decoupled from other responsibilities of an application. In this article, I have listed steps on Integrating Open Policy Agent (OPA) With Kubernetes.
Before getting into the integration part, we will go through some of the key benefits of using OPA.
What is Policy?
A policy is a series of rules governing the behavior of software applications and services. Example: Whether it is application layer or Kubernetes or host level infrastructure or cloud infrastructure or end-user data handled or where workloads are deployed you have to deal with policy all the time in day-to-day work.
Usually, organizations have different strategies in forming policies that are based on legal requirements, authorization rules, technical constraints, architecture characteristics, Network policies, and repeated mistakes. Most of all policies will be contributed by different stakeholders like Product Owners, Architects, Developers, Security engineers, etc in an organization. A typical policy might be looking something like below
- Rules that define which users (identity) can perform which type of operations on which resource
- Rules that define only specific subnets are allowed for external traffic
- Which clusters are allowed to deploy workloads?
- What OS functions the container can perform.
- When will the system be accessed at what time of day?
- Enforcing authorization in a microservice API
Difference between configuration vs policy
For beginners, there will be a slight confusion between configuration and policy. It is as simple as that, Configuration is a set of settings to parameterize the software, whereas policy is a set of rules and regulations that are enforced when we deploy, release or use software, etc. In short, a configuration is the set of settings, and a policy is a thing that enforces those settings?
Note XACML (OASIS standards) / ALFA: Extensible Access Control Markup Language is an open standard XML-based protocol designed to express control policies for enterprise security applications widely adopted since 2001. In the case of OPA, it has Redefined the Rule Engine.
3 Reasons Why do you need an Open Policy Agent (OPA)?
Policy enforcement is the fundamental problem of an organization. If we don’t have a good solution for policy enforcement in the organization, then we’re gonna risk massive fines in terms of security breaches, outages, downtime, and a lot of chaos. Let see some scenarios on why to use an open policy agent.
No Policy
Years back, a newbie did a small POC in the AWS cloud in XYZ company. He got access to a corporate AWS account and created an EC2 instance with Public IP and deployed ECS from there for his work. Since there is no policy available to restrict the instance creation with public IP, it invited hackers to access the VM, and eventually they started mining cryptocurrencies.
To conclude, Public IP should not be allowed for any instance in the corporate network. This would be a good example of why we need the policy to be considered for security breaches.
Setting up Custom Policy engine from Ground Zero
Say you need to implement the same strategy from ground zero. The required components, such as strategy language (Syntax and Semantics) and evaluation engine, need to be brainstormed, designed, implemented, tested, documented, and then maintained to ensure a positive user experience and expected behavior from the new strategy. This is a lot of work !!!
Policy hardcoded in application services
Say, you implement the policy which is tightly coupled with your microservices, it makes it very difficult for the policy to load new rules dynamically and flexibly change based on business requirements. Moreover, different services would have different descriptions of the policy, such as JSON, YAML, etc, so it will be very expensive and painful to manage the policy in the form of code (Policy as Code).
BottomLine: Above all the scenarios will have a lot of challenges. In order to have a more flexible and consistent architecture, we must decouple the policy decision-making process from the complex business logic. Open policy agent does a very good job in terms of decoupling the decision making to a separate process. This is the core concept of the OPA architecture explained below.
What is Open Policy Agent (OPA)?
OPA is a Lightweight general-purpose policy engine that abstracts strategy decisions from your application into a common model and decouples the decision-making step from the complex business logic.
In layman terms, You can implement OPA in any layer of the stack in the system and it will help you to offload the policy decision from your service. So you are decoupling the policy decision from the enforcement piece. It further allows declaratively specified policies to change based on business needs, update without recompilation or redeployment, and more importantly reduce the risk of human error.
As shown in the below diagram, OPA can be abstracted into the following 4 steps.
- Use Rego language to define the Policy and purpose.
- When your service needs a decision (should this request be “allowed” or “denied”) from OPA, this action (Query with the request method, the path, the user) is handed over to OPA to process to execute the Policy.
- OPA validates the attributes against the data (already provided).
- OPA executes the Rego code (in step 1) under specific input data (Data) and returns the result of Policy execution to the original service. The answer would be either “Allow” or “Deny”
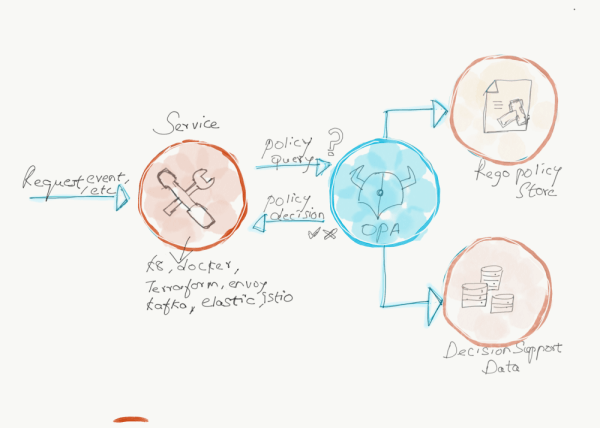
OPA aims to help architects, developers, security practitioners to express policy as code and it can coexist with services. Opa can be integrated into third-party technologies such as Kubernetes, Terraform, Envoy, Docker, etc. The integration method can be sidecar, Standalone service, or library introduction. If you want to integrate OPA, you have to write the policies through a high-level declarative language (Rego) provided by OPA. Refer to the official document for OPA philosophy docs for details
What are the benefits of Policy As Code?
Managing policy as code has a lot of benefits, you can put them in source control and keep track of all changes happening to any given policy, like rollback, track changes in your policy code across versions, etc, can be managed very well. Some of the other benefits include
- Global unified policy description: The description of the policy is expressed in a unified language instead of embedding in the business logic code, nor described in a variety of different forms.
- Improve operation and maintenance efficiency: Different policy codes can be easily reviewed and integrated according to the requirements. A typical example would be, we can enforce company-level policy code before developing its own business-related policies.
- Improve the flexibility of business architecture: Multiple components can share the same policy to execute related logic and also we can dynamically update and load new policies without a change in the business logic code.
Integrating Open Policy Agent (OPA)
Hope you got an idea of what an open policy agent is. Let us take a look at the application scenarios of OPA. So In this article, I have focused on a small use case on how to integrate OPA Gatekeeper (hereafter Gatekeeper) as an admission controller with Kubernetes. Please note OPA is not tied to Kubernetes alone, neither is Kubernetes mandatory for using OPA. There are a lot of use cases available around to get OPA Integrated into anywhere in the stack to solve a variety of different policy-related issues.
Below are the two packages which enable Kubernetes to support OPA control.
Before jumping into Gatekeeper, we have to get an idea of what is an admission controller and the benefits of deploying OPA as an admission controller.
What is An Admission Controller?
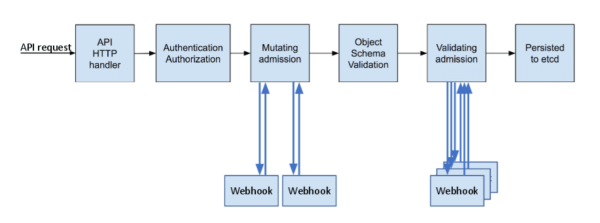
An admission controller is a piece of code used to intercept the request in the Kube-API server for authenticating and authorizing the request before the object is persisted and when the resources are created, updated, and deleted, all decisions are made through admission controllers. Among the series of admission controllers, there are two special ones, which are the focus of our attention today. More information can be found in the official documentation.
- MutatingAdmissionWebhook: Mainly used to parse and modify the request object before the request before forwarding it down the chain. Example: AlwaysPullImages admission controller
- ValidatingAdmissionWebhook: Mainly used for data format verification against specific data. Example: Namespace Admission controller
The benefits of deploying OPA as an admission controller in Kubernetes can meet the following requirements.
Security perspective
- We can prohibit the container from running as root or ensure that the container’s root file system is always mounted as read-only.
- Only pull images from a given private Image Registry.
- Reject deployments that do not meet security standards. For example, a container with a privileged flag can avoid many security checks. Can be verified through the OPA strategy.
Resource control Perspective
- OPA can define policies to allow cluster users to enforce certain conventions, such as having meaningful labels, comments, resource limits, or other settings.
- All Pods are required to add resource limits and minimum replicas when spinned up.
- Prevent the creation of conflicting Ingress objects.
Access control Perspective
- Allow only specific user A to access all resources under namespace1 and namespace2.
What is Open Policy Agent (OPA) Gatekeeper
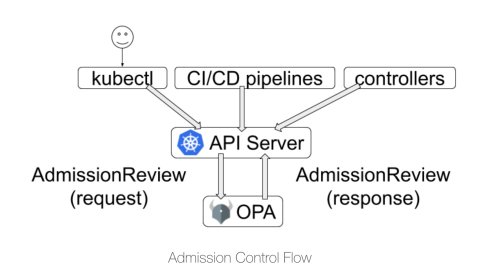
The Gatekeeper is a relatively new project which helps to integrate between OPA and Kubernetes, Gatekeeper can be started as a Pod in Kubernetes and will be registered as Dynamic Admission Controller with API Server after startup. Essentially, Gatekeeper is used as a Webhook Server. When a user uses kubectl or other methods to send a CURD request for a resource to the API Server, the request will be sent to the admission controller after Authentication and Authorization, and finally, AdmissionReview sent to the Gatekeeper in the form of a request. Gatekeeper makes a decision on this request according to the policy of the corresponding service ( configured in the form of CRD ), and AdmissionReview returns the response to the API Server.
Its main architecture is shown in the following figure:
In the current design, Gatekeeper has the following CRD’s named ConstraintTemplate and Constraint which (is our primary focus today) can be considered similar to the relationship between classes and instances.
- ConstraintTemplate: The rego field of ConstraintTemplate specifically describes the Policy in Rego language, but does not specify the specific parameters in the Policy.
- Constraint: Constraint can be considered as an instantiation of a ConstraintTemplate, in which the unspecified parameters of the ConstraintTemplate are specifically configured. Therefore, multiple Constraints can be generated for the same ConstraintTemplate with different parameter configurations.
Gatekeeper vs OPA? Compared to OPA,  Gatekeeper offers more features like

1. Scalable and parameterized strategy definition method.
2. Through CRD defined constraints (constraints), you can easily create a common strategy.
3. A constraint template is defined through CRD, which adds some flexibility.
4. Provides an audit function.
Prerequisites ( Prerequisites )
- Kubernetes version 1.14 or later
- The Kubernetes cluster should be up and running.
You Might Like: Kubernetes Learning Path For BeginnersIntegrating Open Policy Agent (OPA) with Kubernetes
Installation Steps
Step 1: Install OPA Gatekeeper CRD.
Step 2: Create a ConstraintTemplate manifest.
Step 3: Create a constraint manifest.
Step 4: Excercise the policy.
Step 5: Check the violation with the describe command.
Install OPA Gatekeeper CRD
kubectl apply -f https://raw.githubusercontent.com/open-policy-agent/gatekeeper/master/deploy/gatekeeper.yaml

namespace/gatekeeper-system created
resourcequota/gatekeeper-critical-pods created
customresourcedefinition.apiextensions.k8s.io/configs.config.gatekeeper.sh created
customresourcedefinition.apiextensions.k8s.io/constraintpodstatuses.status.gatekeeper.sh created
customresourcedefinition.apiextensions.k8s.io/constrainttemplatepodstatuses.status.gatekeeper.sh created
customresourcedefinition.apiextensions.k8s.io/constrainttemplates.templates.gatekeeper.sh created
serviceaccount/gatekeeper-admin created
podsecuritypolicy.policy/gatekeeper-admin created
role.rbac.authorization.k8s.io/gatekeeper-manager-role created
clusterrole.rbac.authorization.k8s.io/gatekeeper-manager-role created
rolebinding.rbac.authorization.k8s.io/gatekeeper-manager-rolebinding created
clusterrolebinding.rbac.authorization.k8s.io/gatekeeper-manager-rolebinding created
secret/gatekeeper-webhook-server-cert created
service/gatekeeper-webhook-service created
deployment.apps/gatekeeper-audit created
deployment.apps/gatekeeper-controller-manager created
poddisruptionbudget.policy/gatekeeper-controller-manager created
validatingwebhookconfiguration.admissionregistration.k8s.io/gatekeeper-validating-webhook-configuration created
Make sure Gatekeeper CRD is installed.
kubectl get crd
NAME                                                 CREATED AT
configs.config.gatekeeper.sh                         2021-06-28T09:01:12Z
constraintpodstatuses.status.gatekeeper.sh           2021-06-28T09:01:12Z
constrainttemplatepodstatuses.status.gatekeeper.sh   2021-06-28T09:01:12Z
constrainttemplates.templates.gatekeeper.sh          2021-06-28T09:01:12Z
k8salwaysdeny.constraints.gatekeeper.sh              2021-06-28T09:18:16Z
k8sminreplicacount.constraints.gatekeeper.sh         2021-06-28T11:39:54Z
k8srequiredlabels.constraints.gatekeeper.sh          2021-06-28T11:09:45Z
kubectl get pod,svc -n gatekeeper-system
NAME READY STATUS RESTARTS AGE
pod/gatekeeper-audit-76b86bcdb7-h4tmw 1/1 Running 0 2m46s
pod/gatekeeper-controller-manager-c7644c98-cjf9l 1/1 Running 0 2m46s
pod/gatekeeper-controller-manager-c7644c98-nfcq6 1/1 Running 0 2m46s
pod/gatekeeper-controller-manager-c7644c98-vcxbj 1/1 Running 0 2m46s
NAME TYPE CLUSTER-IP EXTERNAL-IP PORT(S) AGE
service/gatekeeper-webhook-service ClusterIP 10.102.228.51 <none> 443/TCP 2m46sExample of Deny all pod creation
This example enforces policy for all pods being rejected from being created.
Gatekeeper consists of ConstraintTemplate and Constraint CRD. Before defining a Constraint you have to define a Constraint Template. A ConstraintTemplate defines the policy that is used to enforce the constraint and also, the general schema of the constraint. So in Gatekeeper ConstraintTemplate, we defined the schema for parameters. And defined the actual parameter value in Constraint. This allows one to use the same template and define multiple constraints with different parameter values.
The syntax expressed using Rego, I know it is still a bit annoying, but fortunately, the official source code provides some sample rules and basic code libraries for reference. In addition, you can also use Rego Playground for online debugging to write a slightly more complicated strategy.
Step 1: Create ConstraintTemplate manifest
vim template.yaml

apiVersion: templates.gatekeeper.sh/v1beta1
kind: ConstraintTemplate
metadata:
  name: k8salwaysdeny
spec:
  crd:
    spec:
      names:
        kind: K8sAlwaysDeny
      validation:
        # Schema for the 'parameters' field
        openAPIV3Schema:
          properties:
            message:
              type: string
  targets:
    - target: admission.k8s.gatekeeper.sh
      rego: |
        package k8salwaysdeny
        violation[{"msg": msg}] {
          1 > 0
          msg := input.parameters.message
        }
Let review the constraint template
- violation[{“msg”: msg}] { } – It defines a message and other details that would be returned to the user if the policy is violated. The rule is covered with the curly braces {}.
- count(missing) > 0 or 1 > 0 – if the total count of items are more than Zero, then it means it is a violation of the policy
- msg := input.parameters.message – If it is a violation, the custom message variable will be returned to the client with a respective message.
Step 2: Create a template
kubectl create -f template.yaml
constrainttemplate.templates.gatekeeper.sh/k8salwaysdeny created
Note: spec.crd.spec.names.kind – Defines the CRD of the constraint created in If there are multiple conditions in rego’s violation, it will be a violation if all the conditions are true.
Step 3: Check the template
kubectl get constrainttemplates
NAME            AGE
k8salwaysdeny   54s
kubectl api-resources | grep constraint
k8salwaysdeny constraints.gatekeeper.sh/v1beta1 false K8sAlwaysDeny
k8salwaysdeny constraints.gatekeeper.sh/v1beta1 false K8sAlwaysDeny
k8sminreplicacount constraints.gatekeeper.sh/v1beta1 false K8sMinReplicaCount
k8srequiredlabels constraints.gatekeeper.sh/v1beta1 false K8sRequiredLabels
constraintpodstatuses status.gatekeeper.sh/v1beta1 true ConstraintPodStatus
constrainttemplatepodstatuses status.gatekeeper.sh/v1beta1 true ConstraintTemplatePodStatus
constrainttemplates templates.gatekeeper.sh/v1beta1 false ConstraintTemplateStep 4: Create a constraint manifest
Now, using this ConstraintTemplate, create a Constraint as follows
vim constraints.yaml
apiVersion: constraints.gatekeeper.sh/v1beta1
kind: K8sAlwaysDeny
metadata:
  name: pod-always-deny
spec:
  match:
    kinds:
      - apiGroups: [""]
        kinds: ["Pod"]
  parameters:
    message: "You are restricted to Create Pods"
We can define one or more constraints for the constraint template. In the above configuration, the “Kind” must match the value defined in the constraint template. Also in the “Kinds” part, we should define which k8 resource this policy will apply to. In our case, we are targeting that any apiGroup that has the Pod kind is a valid match.
Step 5: Create a constraint
kubectl create -f constraints.yaml
k8salwaysdeny.constraints.gatekeeper.sh/pod-always-deny created
Step 6: Check the constraint
kubectl get k8sAlwaysDeny
NAME              AGE
pod-always-deny   4m30s
Step 7: Exercise the policy
If you try to create a pod, you will get an error similar to below.
kubectl run pod --image=nginx
Error from server ([pod-always-deny] You are restricted to Create Pods): admission webhook "validation.gatekeeper.sh" denied the request: [pod-always-deny] You are restricted to Create Pods
Step 6: Check total Violations count and messages
Check the Status part of the describe command, you can check the current violation status.
kubectl describe k8sAlwaysDeny pod-always-deny
Name:         pod-always-deny
Namespace:
Labels:       <none>
Annotations:  <none>
API Version:  constraints.gatekeeper.sh/v1beta1
Kind:         K8sAlwaysDeny
Metadata:
  Creation Timestamp:  2021-06-28T09:24:47Z
  Generation:          1
  Managed Fields:
    API Version:  constraints.gatekeeper.sh/v1beta1
    Fields Type:  FieldsV1
    fieldsV1:
      f:status:
    Manager:      gatekeeper
    Operation:    Update
    Time:         2021-06-28T09:24:47Z
    API Version:  constraints.gatekeeper.sh/v1beta1
    Fields Type:  FieldsV1
    fieldsV1:
      f:spec:
        .:
        f:match:
          .:
          f:kinds:
        f:parameters:
          .:
          f:message:
    Manager:         kubectl-create
    Operation:       Update
    Time:            2021-06-28T09:24:47Z
  Resource Version:  10486
  UID:               5df1c89e-0666-4248-9c92-cfdda1a661d3
Spec:
  Match:
    Kinds:
      API Groups:

      Kinds:
        Pod
  Parameters:
    Message:  You are restricted to Create Pods
Status:
  Audit Timestamp:  2021-06-28T09:29:38Z
  By Pod:
    Constraint UID:       5df1c89e-0666-4248-9c92-cfdda1a661d3
    Enforced:             true
    Id:                   gatekeeper-audit-76b86bcdb7-h4tmw
    Observed Generation:  1
    Operations:
      audit
      status
    Constraint UID:       5df1c89e-0666-4248-9c92-cfdda1a661d3
    Enforced:             true
    Id:                   gatekeeper-controller-manager-c7644c98-cjf9l
    Observed Generation:  1
    Operations:
      webhook
    Constraint UID:       5df1c89e-0666-4248-9c92-cfdda1a661d3
    Enforced:             true
    Id:                   gatekeeper-controller-manager-c7644c98-nfcq6
    Observed Generation:  1
    Operations:
      webhook
    Constraint UID:       5df1c89e-0666-4248-9c92-cfdda1a661d3
    Enforced:             true
    Id:                   gatekeeper-controller-manager-c7644c98-vcxbj
    Observed Generation:  1
    Operations:
      webhook
  Total Violations:  12
  Violations:
    Enforcement Action:  deny
    Kind:                Pod
    Message:             You are restricted to Create Pods
    Name:                hello-minikube
    Namespace:           default
    Enforcement Action:  deny
    Kind:                Pod
    Message:             You are restricted to Create Pods
    Name:                gatekeeper-audit-76b86bcdb7-h4tmw
    Namespace:           gatekeeper-system
    Enforcement Action:  deny
    Kind:                Pod
    Message:             You are restricted to Create Pods
    Name:                gatekeeper-controller-manager-c7644c98-cjf9l
    Namespace:           gatekeeper-system
    Enforcement Action:  deny
    Kind:                Pod
    Message:             You are restricted to Create Pods
    Name:                gatekeeper-controller-manager-c7644c98-nfcq6
    Namespace:           gatekeeper-system
    Enforcement Action:  deny
    Kind:                Pod
    Message:             You are restricted to Create Pods
    Name:                gatekeeper-controller-manager-c7644c98-vcxbj
    Namespace:           gatekeeper-system
    Enforcement Action:  deny
    Kind:                Pod
    Message:             You are restricted to Create Pods
    Name:                coredns-74ff55c5b-nbb4s
    Namespace:           kube-system
    Enforcement Action:  deny
    Kind:                Pod
    Message:             You are restricted to Create Pods
    Name:                etcd-minikube
    Namespace:           kube-system
    Enforcement Action:  deny
    Kind:                Pod
    Message:             You are restricted to Create Pods
    Name:                kube-apiserver-minikube
    Namespace:           kube-system
    Enforcement Action:  deny
    Kind:                Pod
    Message:             You are restricted to Create Pods
    Name:                kube-controller-manager-minikube
    Namespace:           kube-system
    Enforcement Action:  deny
    Kind:                Pod
    Message:             You are restricted to Create Pods
    Name:                kube-proxy-gzrx9
    Namespace:           kube-system
    Enforcement Action:  deny
    Kind:                Pod
    Message:             You are restricted to Create Pods
    Name:                kube-scheduler-minikube
    Namespace:           kube-system
    Enforcement Action:  deny
    Kind:                Pod
    Message:             You are restricted to Create Pods
    Name:                storage-provisioner
    Namespace:           kube-system
Events:                  <none>
Step 7: Modify the policy and exercise the changes.
Change the contrainttemplate by adding below false conditions. Repeat the steps from 1 to 6 and you should get Total Violations as 0.
violation[{"msg": msg}] {

          1 > 2 # false
          msg := input.parameters.message
        }
Step 8: Delete the resource.
kubectl delete -f template.yaml
kubectl delete -f constraint.yaml
Example of enforcing a label in Namespace
This example enforces a label in Namespaces.
Step 1: Create ConstraintTemplate manifest.
vim template_label.yaml

apiVersion: templates.gatekeeper.sh/v1beta1
kind: ConstraintTemplate
metadata:
  name: k8srequiredlabels
spec:
  crd:
    spec:
      names:
        kind: K8sRequiredLabels
      validation:
        # Schema for the "parameters" field
        openAPIV3Schema:
          properties:
            labels:
              type: array
              items: string
  targets:
    - target: admission.k8s.gatekeeper.sh
      rego: |
        package k8srequiredlabels

        violation[{"msg": msg, "details": {"missing_labels": missing}}] {
          provided := {label | input.review.object.metadata.labels[label]}
          required := {label | label := input.parameters.labels[_]}
          missing := required - provided
          count(missing) > 0
          msg := sprintf("you must provide labels: %v", [missing])
        }
Step 2: Create a template.
kubectl create -f template_label.yaml
constrainttemplate.templates.gatekeeper.sh/k8srequiredlabels created
Step 3: Create a constraint manifest
vim all_namespace_must_have_ns_constraints.yaml

apiVersion: constraints.gatekeeper.sh/v1beta1
kind: K8sRequiredLabels
metadata:
  name: ns-must-have-ns
spec:
  match:
    kinds:
      - apiGroups: [""]
        kinds: ["Namespace"]
  parameters:
    labels: ["ns"]
Step 4: Create a constraint
kubectl create -f all_namespace_must_have_ns_constraints.yaml
k8srequiredlabels.constraints.gatekeeper.sh/ns-must-have-ns created
kubectl get K8sRequiredLabels
NAME               AGE
Ns-must-have-ns   60s
Step 5: Exercise the policy
If you try to create a Namespace without the label “ns”, you will get an error similar to below.
kubectl create namespace test
Error from server ([ns-must-have-ns] you must provide labels: {"ns"}): admission webhook "validation.gatekeeper.sh" denied the request: [ns-must-have-ns] you must provide labels: {"ns"}
Step 6: Check the violation with the describe command.
kubectl describe K8sRequiredLabels ns-must-have-ns
Name:         ns-must-have-ns
Namespace:
Labels:       <none>
Annotations:  <none>
API Version:  constraints.gatekeeper.sh/v1beta1
Kind:         K8sRequiredLabels
Metadata:
  Creation Timestamp:  2021-06-28T11:12:16Z
  Generation:          1
  Managed Fields:
    API Version:  constraints.gatekeeper.sh/v1beta1
    Fields Type:  FieldsV1
    fieldsV1:
      f:status:
    Manager:      gatekeeper
    Operation:    Update
    Time:         2021-06-28T11:12:16Z
    API Version:  constraints.gatekeeper.sh/v1beta1
    Fields Type:  FieldsV1
    fieldsV1:
      f:spec:
        .:
        f:match:
          .:
          f:kinds:
        f:parameters:
          .:
          f:labels:
    Manager:         kubectl-create
    Operation:       Update
    Time:            2021-06-28T11:12:16Z
  Resource Version:  14794
  UID:               f3e62ad4-c999-4794-9d5b-20a816218bab
Spec:
  Match:
    Kinds:
      API Groups:

      Kinds:
        Namespace
  Parameters:
    Labels:
      ns
Status:
  Audit Timestamp:  2021-06-28T11:19:19Z
  By Pod:
    Constraint UID:       f3e62ad4-c999-4794-9d5b-20a816218bab
    Enforced:             true
    Id:                   gatekeeper-audit-76b86bcdb7-h4tmw
    Observed Generation:  1
    Operations:
      audit
      status
    Constraint UID:       f3e62ad4-c999-4794-9d5b-20a816218bab
    Enforced:             true
    Id:                   gatekeeper-controller-manager-c7644c98-cjf9l
    Observed Generation:  1
    Operations:
      webhook
    Constraint UID:       f3e62ad4-c999-4794-9d5b-20a816218bab
    Enforced:             true
    Id:                   gatekeeper-controller-manager-c7644c98-nfcq6
    Observed Generation:  1
    Operations:
      webhook
    Constraint UID:       f3e62ad4-c999-4794-9d5b-20a816218bab
    Enforced:             true
    Id:                   gatekeeper-controller-manager-c7644c98-vcxbj
    Observed Generation:  1
    Operations:
      webhook
  Total Violations:  5
  Violations:
    Enforcement Action:  deny
    Kind:                Namespace
    Message:             you must provide labels: {"ns"}
    Name:                default
    Enforcement Action:  deny
    Kind:                Namespace
    Message:             you must provide labels: {"ns"}
    Name:                gatekeeper-system
    Enforcement Action:  deny
    Kind:                Namespace
    Message:             you must provide labels: {"ns"}
    Name:                kube-node-lease
    Enforcement Action:  deny
    Kind:                Namespace
    Message:             you must provide labels: {"ns"}
    Name:                kube-public
    Enforcement Action:  deny
    Kind:                Namespace
    Message:             you must provide labels: {"ns"}
    Name:                kube-system
Events:                  <none>


{
  "apiVersion": "v1",
  "kind": "Namespace",
  "metadata": {
    "name": "development",
    "labels": {
      “Env”: "development"
    }
  }
}
Step 7: Modify the policy and excercise the changes.
Create a new YAML file called with the required label value “ns” similar to below.
vim namespace-dev.yaml

{
  "apiVersion": "v1",
  "kind": "Namespace",
  "metadata": {
    "name": "development",
    "labels": {
      "ns": "development"
    }
  }
}
Step 8: Namespace is created successfully (policy is honored).
kubectl create -f namespace-dev.yaml
namespace/development created
Example of enforcing a minimum number of replicas in Deployment
This example of enforcing a minimum number of replicas (2) in Deployment
Step 1: Create ConstraintTemplate manifest.
apiVersion: templates.gatekeeper.sh/v1beta1
kind: ConstraintTemplate
metadata:
  name: k8sminreplicacount
spec:
  crd:
    spec:
      names:
        kind: K8sMinReplicaCount
      validation:
        # Schema for the `parameters` field
        openAPIV3Schema:
          properties:
            min:
              type: integer
  targets:
    - target: admission.k8s.gatekeeper.sh
      rego: |
        package k8sminreplicacount

        violation[{"msg": msg, "details": {"missing_replicas": missing}}] {
          provided := input.review.object.spec.replicas
          required := input.parameters.min
          missing := required - provided
          missing > 0
          msg := sprintf("you must provide %v more replicas", [missing])
        }
Step 2: Create a template.
kubectl create -f template_replicas.yaml
constrainttemplate.templates.gatekeeper.sh/k8sminreplicacount created
Step 3: Create a constraint manifest
vim all_deployment_must_have_min_replicacount.yaml

apiVersion: constraints.gatekeeper.sh/v1beta1
kind: K8sMinReplicaCount
metadata:
  name: deployment-must-have-min-replicas
spec:
  match:
    kinds:
      - apiGroups: ["apps"]
        kinds: ["Deployment"]
  parameters:
    min: 2
Step 4: Create a constraint
kubectl create -f all_deployment_must_have_min_replicacount.yaml
k8sminreplicacount.constraints.gatekeeper.sh/deployment-must-have-min-replicas created
Step 5: Exercise the policy
If you try creating a deployment with replicas less than 2, you will get an error similar to below.
kubectl create deploy test --image=nginx
error: failed to create deployment: admission webhook "validation.gatekeeper.sh" denied the request: [deployment-must-have-min-replicas] you must provide 1 more replicas
Step 6: Modify the policy and excercise the changes.
Create a new deployment YAML file with replicas value as 2 similar to below.
vim deployment.yaml

apiVersion: apps/v1
kind: Deployment
metadata:
  name: test-nginx-deployment
  labels:
    app: testnginx
spec:
  replicas: 2
  selector:
    matchLabels:
      app: testnginx
  template:
    metadata:
      labels:
        app: testnginx
    spec:
      containers:
      - name: testnginx
        image: nginx:latest
        ports:
        - containerPort: 80
Step 8: Deployment is created successfully (policy is honored).
kubectl create -f deployment.yaml
deployment.apps/test-nginx-deployment created
Open Policy Agent (OPA) Takeaways
Gatekeeper is more extensible than Open Policy Agent and can manage policies by template. Implementing OPA in your application stack can bring a certain learning cost in the early stage, but the value of the later period is to allow the Policy to have similar characteristics of code like Reusability, testable, versioning, abstraction, etc.
- Decouple the policy decision-making process from the complex business logic
- Unify & centralize the policy definition and facilitate the enforcement of those policies the entire stack.
- Manage policy as code.
References
- OPA Documentation
- Gatekeeper Documentation
- OPA Gatekeeper: Policy and Governance for Kubernetes
- OPA Gatekeeper Introduction
- A Guide to Kubernetes Admission Controllers for a quick primer on admission controllers.
- Dynamic Admission Control for details on configuring external admission controllers.
- Gatekeeper samples Library for Rules.
- OPA Samples library for Rules
- OPA Constraint Framework
- Grammer: Policy Language , Policy Reference
- Deploy OPA as an admission controller from scratch