SonarQube is an open platform for managing continuous inspection of the code quality, which can locate potential errors in the codebase. It currently supports more than 20+ programming languages including support on C#, JavaScript, C/C++, TypeScript, Go, Python, etc., and other languages. In this article, we will see How to Setup SonarQube locally on Mac OS with HomeBrew
Installation steps
The installation of SonarQube is divided into these steps:
- Install java environment
- Installation of SonarQube/Sonar-Scanner
- Set SonarQube environment Variable
- Start SonarQube
- Log in to SonarQube Dasboard
- Create a new project in SonarQube Dashboard
- Add sonar-project. properties
- Run Analysis
- View SonarQube scan results
Install Java Environment
Follow this article’s first section to install and configure java in MacOs.
Installation of SonarQube/Sonar-Scanner
brew install sonar
brew install sonar-scanner
Set SonarQube environment Variable
Enter vim ~/.bash_profile in the terminal to configure the sonar path. {version } can be replaced with the installed current version.
export SONAR_HOME=/usr/local/Cellar/sonar-scanner/{version}/libexec
export SONAR=$SONAR_HOME/bin export PATH=$SONAR:$PATH
Start SonarQube
brew services start sonarqube
Log in to SonarQube Dasboard
Enter http://localhost:9000 in the browser to enter the following page.

Log in to SonarQube and enter the account and password admin/admin
Create new project in SonarQube Dashboard
- Create a new project.
Click -> Create a new project button.

- Project key and a Display name
Provide -> Project key and a Display name and click the Set Up button.
- Generate Token
Under Provide a token, select Generate a token. Give your token a name, click the Generate button, and click Continue.
- Download Sonar Scanner Commands.
Select your project’s main language under Run analysis on your project, and Operating System.
Download Sonar Scanner commands to execute a Scanner on your code.


Add sonar-project Properties
Add a sonar-project. properties file in your project directory
sonar.python.coverage.reportPaths=../coverage.xml
# unique project identifier (required)
sonar.projectKey=SalesProject
# project metadata (used to be required, optional since SonarQube 6.1)
sonar.projectName=SalesProject
sonar.projectVersion=1.0
# path to source directories (required)
sonar.sources=./src
sonar.sources=src
# path to test source directories (optional)
#sonar.tests=tests
Run Analysis
Switch to the project path and execute sonar-scanner
sonar-scanner \
 -Dsonar.projectKey=SalesProject \
 -Dsonar.sources=. \
 -Dsonar.host.url= http://localhost:9000 \
 -Dsonar.login=feb2c84dacaf080d46ac52214edd1b32f8784b7a
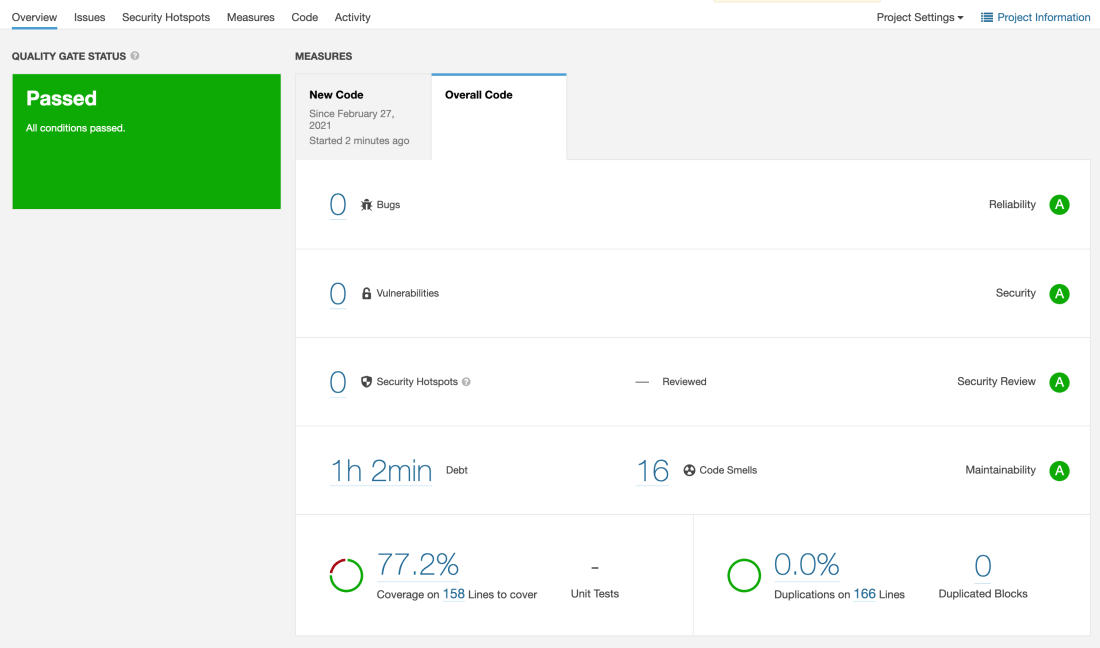
View SonarQube scan results
Log in to SonarQube to view scan results
An outstanding share! I’ve just forwarded this onto a coworker who had been doing a little research on this. And he actually bought me breakfast simply because I found it for him… lol. So let me reword this…. Thank YOU for the meal!! But yeah, thanks for spending some time to talk about this topic here on your web site.
You’re very welcome! I’m glad to hear that the post was helpful to you.
Spent a day on the SonarQube setup..
Then, I found this article! It works. Thanx a lot!
You’re very welcome! I’m glad to hear that the post was helpful to you.
I like the efforts you have put in this, regards for all the great content.
Magnificent beat ! I wish to apprentice while you amend your website, how can i subscribe for a blog site? The account aided me a acceptable deal. I had been tiny bit acquainted of this your broadcast provided bright clear concept
Thank you for your kind words about my website! I am glad you find it informative and engaging. You can subscribe my blog with your personal email Id with below “subscribe” button. If you have any more questions or need assistance, feel free to reach out!
ERROR Error during SonarScanner CLI execution
java.lang.IllegalStateException: Failed to get server version
Great post! I found the step-by-step instructions very helpful, especially the troubleshooting tips. I was able to set up SonarQube on my Mac without any issues. Thanks for sharing!
Great guide! I followed your steps to set up SonarQube on my Mac, and everything worked smoothly. Thanks for making it so easy to understand!
Thanks for the detailed guide! I successfully set up SonarQube on my Mac following your steps. The troubleshooting tips were particularly helpful. Keep up the great work!